Using XSquawkBox
Connecting to the Network
To connect to the network, access the “Plugins” menu at the top of the screen, select “XSquawkBox” and then pick “Connect…”. A dialog box will come up asking for the following fields:
- Callsign
The callsign you will be known as on the network for this session. It must include only letters, numbers, hypens or underscores.
Examples:
N1943,DAL2024,VH-RDO- Real Name
Your full name (or otherwise as permitted by VATSIM Policy).
Examples: John Q. Smith
- Server
The VATSIM Server name (e.g:
AUSTRALIA,USA-W, etc), IP address or fully-qualified domain name of your server.You generally want to pick a server from the dropdown list that is closest to you geographically.
Note
Do not attempt to connect to
AFVDATA- it’s not a real server.If you want to connect to
localhostor other single element domain name, you MUST use the IP address instead - single-element names are interpreted as server list entries.- Port
- The port for the server you will connect to. This should be set to
6809when on the VATSIM network. - ID
Your pilot’s ID, also known as your Certificate ID. It’s a number you receive when you sign up to VATSIM.
Example:
1810123- Password
The password for your VATSIM account - given to you when you sign up for VATSIM. This is case-sensitive so make sure you enter your password exactly as issued. It will appear as stars so that other people cannot read it.
Caution
The text/traffic server does not handle your password in a case-sensitive manner, but the voice servers do. If you get the case in your password incorrect, you will be able to connect, but voice will fail.
- Aircraft Model
The ICAO equipment code of your aircraft.
If you do not know the correct 4 letter equipment code, you can type a few letters from the name or ICAO code of this airplane, then click on the correct item in the menu to set it; XSquawkBox will search its database of thousands of aircraft and show you named matches.
Note
It is important that you select an item from the popup, even if it’s the only match, otherwise the change will not take effect!
- Airline
(optional) The 3 letter ICAO airline code that you want your aircraft to appear as to others.
If you don’t know the correct code, you may pick an airline by typing part of its name, and clicking on the correct airline from the menu. Or you may leave this blank.
- Livery
- (optional) For some aircraft, multiple paint schemes are defined. This optional setting will let you nominate a specific sub-livery that your aircraft should appear as to others.
Note
The aircraft, airline and livery you pick in XSquawkBox are used to tell other pilots on the network what your plane looks like. You do not have to pick values that match your plane in X-Plane. For example, if you are flying a SWA 737 400 in X-Plane you could pick a UAL 737 800 when you connect.
That said, you should not list yourself as a very different planes. For
example, should you fly an FA-18 but list yourself as aircraft model code
C172, then other users will see a Cessna 172 flying at 350 knots, which
will look very strange.
Once you’ve filled in the necessary fields, click the connect button; you will see the prompt “Connecting…” at the top of your screen. If the login is successful, you will then see the welcome message for the VATSIM network. If you cannot login, you will receive an error message. If the server cannot be reached at all, you will simply see “You have been disconnected.”
Disconnecting from the Network
To disconnect from the network, access the “Plugins” menu at the top of the screen, select “XSquawkBox” and then pick “Disconnect”. After a second or two, the message “Disconnected” will appear on the screen.
You may also be disconnected inadvertently due to internet problems, if a supervisor removes you from the network, or if XSquawkBox detects a problem with your simulator configuration.
Operating the Transponder
A transponder is a radio transmitter and receiver on your airplane that helps air traffic controllers identify you on their radar screens. The transponder transmits a four-digit code (often called a “squawk code”) that identifies your aircraft.
The transponder on your airplane’s panel controls your squawk code as seen by air traffic control on the network. If you do not have a transponder on your plane’s panel, you will not be able to change your transponder settings and may not be allowed on the network.
Tip
You can add a transponder to your aircraft’s panel using Plane-Maker. You should refer to the Plane-Maker documentation for further information.
Use the keyboard or mouse to change transponder codes as assigned by ATC. Do not
ever let the transponder read 7500, 7600, or 7700; as in real life
this will trigger alerts for ATC.
Use the transponder controls in your aircraft to toggle between standby and
Mode C (Typically labelled ALT, although in TCAS equipped aircraft with a
combined mode knob, the TA and TA/RA settings will also work).
To send an ident signal (“Squawk Ident”), click the ‘ident’ button on your transponder on the x-plane panel with the mouse. You should only do this as explicitly directed by ATC.
Using the Radio
Caution
Even if you are familiar with XSquawkBox 1.x - please make sure to read this section as some very important details have changed.
Unlike XSquawkbox 1, which could only send and receive text on COM1, and could only transmit voice on COM1, XSquawkBox 2 makes full use of audio panel controls and fully supports sending and receiving on both radios, both in text and using voice.
Transmissions (both voice and text) will be sent to the selected transmission radio.
XSquawkBox 2 supports 8.33Khz tuning over both voice and text, although the VATSIM network currently does not. You should only use 25Khz radio frequencies.
Note
There is a long standing error in VATSIM usage with many ATC and Pilot clients, and consequentially, users, reporting x.x25MHz and x.x75MHz frequencies incorrectly as being x.x20MHz and x.x70MHz respectively.
XSquawkBox now corrects all usage of .x20 and .x70 to their correct frequencies. This will cause some deviation from VATspy, or other tools, but you will get the correct behaviour when you tune the corrected frequency.
Tuning via Commands
XSquawkBox permits tuning the radio by issuing a // or /// command in the
text radio entry box.
To tune COM1, you can enter //<freq> and that will tune the active COM1
frequency. You can also use //-<freq> to tune the standby frequency. For
example, entering //122.80 will tune 122.800MHz on COM1.
Similarly, for COM2, you can enter ///<freq> and that will tune the active
COM2 frequency. You can also use ///-<freq> to tune the standby frequency.
Tip
XSquawkBox will deal with skipped trailing zeros, and, as of 2.0 (stable) will set .x2 and .x7 to the correct channels whereas previous versions would not.
e.g: entering //119.27 or //119.270 will tune 119.275MHz, and
//132.8 will tune 132.800MHz as expected.
Using Text
When you receive a text message on a tuned radio, it’ll appear in the text window. If the text window is hidden, it’ll automatically unhide for a few seconds so you can read the message, before hiding again.
You can toggle visibilty of the text window using the key or button bound to
xsquawkbox/command/toggle_text_window. (Recommended key “Keypad -“)
To transmit on text, make sure you have the correct transmission radio selected
on your radio panel, and press the key bound to
xsquawkbox/command/start_text_entry (recommended key “Enter”)
This will bring up the text radio view (if hidden) and enable keyboard input.
You can type your message (or command starting with .) and press enter to
send it.
If you wish to transmit to a specific callsign, you can use the command:
.msg <callsign> <message...>
If you want to respond to a private or direct message, you can use the key bound
to xsquawkbox/command/reply_next (recommended key “Keypad *”) to cycle
through people who have recently sent to you.
For details about other commands that can be entered through the text input, please see the section about commands below.
Using Voice
XSquawkBox simulates a 2 radio stack with a monaural mixer. It responds to the X-Plane 10/11 controls for radio volume, audio transmission select and receive enable and these must be set approriately for the radios to work as desired. See the section on Audio Panel Controls for some examples as to how these are configured.
As real world radios are half-duplex, the XSquawkBox voice radios similarly are so - if you are transmitting, you will not hear any radio coming in on that unit. You will still hear audio received by your secondary radio (if enabled).
To transmit, make sure the transmission selector on your audio panel is set
to the radio you want to talk on, and press the button or key bound to
xsquawkbox/voice/ptt, and speak clearly into your microphone only releasing
the button or key after you have finished speaking.
Audio Panel Controls
In order to make use of your radios, you need to be familiar with the audio panel controls in your chosen aircraft model, in particular, the controls for audio volume, transmission source, and receive channel enable.
Note
Not all aircraft models expose all controls properly. Please see the note at the end of this section on how to control XSB if the controls aren’t available.
General Aviation Aircraft
Audio controls will typically be found center of the instrument panel and will be divided into a dedicated audio control panel which selects the receive channels and transmission channel, and the radios or GPS units, which should have the volume control for that source.

X-Plane 11 audio controls in the Cessna 172 (Center of Main Instrument Panel)
Airliners
Audio controls (for the captain / left-seat) will typically be on the pedestal immediately, or to the forward left of the captain’s seat. This is typically mirrored for the right set.
Note
XSquawkBox only supports control through the standard datarefs which allow for a single position and audio system only. If your aircraft model connects the copilot controls to it’s own set of datarefs, you will not be able to control XSB’s audio with those controls.
The audio panel will typically control volume, output enable and transmission source selection all in one place.
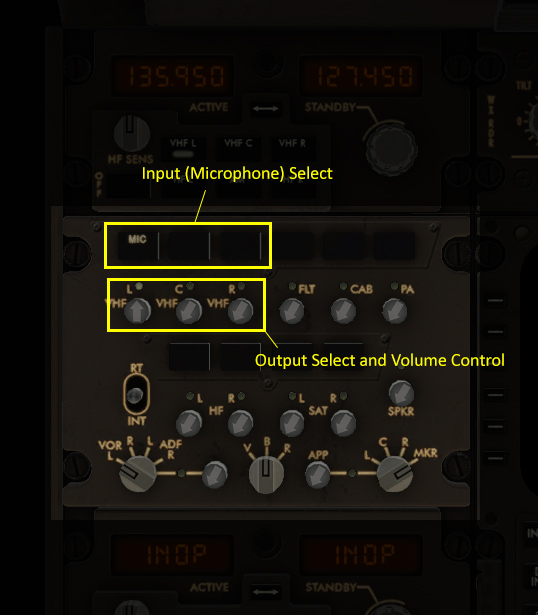
X-Plane 11 audio controls in the Boeing 747-400 (Center Pedestal)
In the 747-400 example above, individual radio receivers are enabled by clicking on the center of the volume stem, causing an indicator above them to illuminate.
Aircraft without a working audio panel
If your aircraft model doesn’t have a working transmission selector, you can use
the .tx ? command to find out which radio is set to transmit, and use the
.tx COM1 or .tx COM2 commands to change the active radio to send.
Similarly, if your aircraft model’s audio panel doesn’t have proper receive
select controls you can use .rx COM1 on and .rx COM1 off (and similarly
for COM2) to turn that audio source on and off.
Filing a Flight Plan
You can file a flight plan from XSquawkBox.
Access the “Plugins” menu at the top of the screen, select “XSquawkBox” and then pick the “Send Flightplan…” menu item.
A flight plan dialog box will appear. From this dialog box you can enter your flight plan and then press Send to send it to the network.
If ATC has edited your flight plan, sending a new one may have no effect. If you resend a flight plan and the controller does not receive it, notify the controller that he or she must refile the flight plan for you.
Tip
Even if you have already filed a flight plan online via the VATSIM web page, or even if you are flying VFR and do not intend to request ATC services, you may still want to fill out the flight plan dialog box with a departure and destination airport as XSquawkBox will use this information to correctly set up weather from your departure and destination airports, rather than airports you overfly nearby your departure and destination.